Thu Apr 17, 2003 3:03 pm Inspired by PDF's thread in the Retrogaming Roundtable, I decided I'm going to do a SuperGun construction journal. This will be a way to track my progress for me and might be a help to anyone looking to build one of these suckers for them selves. I've been debating on this for a long time and considering 99% of the games I play were arcade JAMMA board to begin with, it just makes sense to finally start collecting them. Plus I've always wanted a Neo Geo and getting into the home cart scene requires a lot of money. Yeah, you can get the converter cart to play MVS, but for that cost I figured I could get a MVS board and make a SuperGun. Specifically, I want a SuperGun to play shmups and Neo Geo on. So many shmups never made it home and MAME just isn't cutting it for me anymore. Neo Geo MVS carts are the only way I'm going to be able to afford getting into the Neo. I'd like to be able to expand to Street Fighter type fighting games someday (assuming I can get over my fear of the CPSII's suicide battery ;)) First of all, I considered going with a pre-made 'gun. Seems like the going rate is $300 and I've heard mixed things about them. The big problem I've heard, other than being stuck with composite video outs, was that you'd still have to change stuff around to use some JAMMA boards (Neo-Geo, for one.) Then I considered finding someone else to make it for me. But the more I looked into what a SuperGun is, the more it seemed like I could do this myself. Plus, if something goes wrong or I want to change something, I'll know what was done in the first place. I also want to make this as modular as possible. I want to be able to use RGB output or NTSC composite/S-Video without having to rewire a bunch of stuff. I want to be able to use as many different board as possible. And I want the controllers to be detachable. On to parts: A very basic list of parts I need include:
Power Supply
JAMMA Harness
Wire
Connectors
Joysticks and buttons
RGB->NTSC video output
Some sort of case to put it all in So, here we go...I decided to use a PC power supply because I had one laying around. According to everything I've read, this should work ok, though some people seem to be really against using one. Since I also have the case from the computer I stripped the PSU from, I'm going to use that as well. So my SuperGun is going to look like an old Compaq PC...heh. The JAMMA harness is what you connect to the game board. Kind of like a cartridge based system, except all the processing is done on the board. All the JAMMA harness does is link the game PCB to the power, audio, video and control panel. I ordered a pre wired JAMMA harness from Bob Roberts. http://www.dameon.net/BBBB/parts.html He's got a ton of stuff. In fact I ordered a bunch of little bits and pieces I needed from him as well. I'll be able to use this harness for everything I need. There's a couple of differences in the pinout for a Neo MVS board and standard JAMMA, but I think with a switch I can take care of it. The one problem with JAMMA is it outputs a low sync RGB signal. What this means in English is you can't just hook it up to your TV without going through a converter. My options here were 1)buy an old Commodore monitor which can handle the signal 2)buy a XRGB upscan converter so I can use a PC monitor or 3)get a RGB to NTSC converter. Well, for number one, I actually found a Magnavox monitor that is physically the same as the Commodore monitors with one problem. It only has a composite video in. The Commodore models have an analog RGB in, which is what I need. So that won't work unless I can figure out how to hack the monitor to take this signal. Plus I'm not too thrilled with playing on a 13" screen. Number two is expensive. Granted, I could use the XRGB on almost all my consoles and play anything on my PC monitor, but the XRGB is one expensive box ($200+). I'm looking to bring this in at under $150 total, so that's out. Number three is how I decided to go. This isn't the easiest option necessarily, and converting the video is going to produce a lower image quality. (See www.gamesx.com for much more info on that.) JHendrix (link in last post) built a RGB>NTSC converter, but it looks like a nightmare to me. The guy at the Idiot's Guide had someone make a converter out of a PS2 DVD recording cable. I'm pretty convinced I could do this hack myself, but finding that cable turned out to be a problem so I'm getting the same guy to make one for me. I'm going to have it connect to the SuperGun though a connector that is similar to the Commodore one so if I figure out how to hack my monitor I can switch easily or if I ever get an XRGB I can use that. For the sticks, I considered hacking a Saturn or Genny pad, but I changed my mind. Looks doable, but a lot of trouble. If I'm going to do this, might as well go all out, right? The other problem with using a Sega pad, was the button layout. The Genny only has three buttons which is one short for Neo-Geo. The Saturn has enough buttons, but I'd run into a problem later if I wanted to play a Capcom fighter. Why you ask? Well it's like this...Neo control panels look like this: 0=button :) 0000
1234 Capcom like this: 123
000
000
456 So that 4th Neo button would either have to be on a different row, a shoulder button, or I'd have to make a switch to change everything around to use a PSX type arrangement for Neo: 12
000
000
34 and switch back for Capcom. In short, too much damn work. This is how my sticks are going to look when done: 1234
0000
0000
456 plus a button for start and insert coin. You might notice 2 buttons for #4. It works out because Capcom has buttons 456 running off a "kick harness" which is another harness that hooks up to the board and gets signals just from those buttons. The Neo MVS uses the 4 button slots on a standard JAMMA harness. So if I'm playing a Neo Geo game, the top row of buttons will work and if/when I get a Capcom board, I'll wire the bottom ones in. I ordered the parts from X-Arcade via eBay. Everyone seems to like the X-Arcade sticks and they sell the parts a lot cheaper than anyone else. I still need to figure out how to make a case for these suckers. I suck at wood working. The sticks will connect to the system using the same pinout as a standard Neo Geo stick. There's enough extra pins to connect the extra 4 buttons a Neo doesn't have. Plus I could use Neo sticks on this SuperGun, and Neo sticks are easy to convert to another system. I'd love to use these on MAME when I finish them!
Thu Apr 17, 2003 3:38 pm OK, so this is where I am now, I have everything except the wood for the controller boxes ordered and I'm just waiting for stuff to come in. Here's the cost break down so far: All prices include shipping, etc. 2 joysticks and 20 buttons from X-Arcade: $28 JAMMA harness, wires, fuses, speakers, lots of random BS from Bob Roberts: $43 RGB to NTSC Converter: $51 Which puts me at $122. I still have to buy the wood and I don't know what else I'm forgetting, but I'm under budget so far. And that's where I am right now.
Fri Apr 18, 2003 5:16 pm OK, got the controls from X-Arcade today. Man, that's gotta be the fastest turn around on an eBay transaction. 2 days! The wiring isn't going to be so bad. I can use quick connect crimpons on all the switches. I still don't know what I'm going to do about the woodworking though. I'm really intimidated by that. It feels real now though. Sitting here with a box of arcade parts makes this whole thing feel real now.
Mon Apr 21, 2003 9:36 pm Well, the controllers are done and this is what they look like: 
It's 29.5"x10"x12", a bit bigger than I figured. I think I'm going to need to put handles on the sides to move the damn thing The idea was, #1 make it compatible with any possible button set up I'd run into. #2 adaptability. #3 comfort. If you're sitting on the floor, it's at a comfortable height. I think 2 people can be on this box and not bump each other. I've got plenty of buttons, and I'm planning on getting an I-Pac and using this for MAME, so I've got 2 sticks for Robotron!!! Whoo hoo. Wanna look inside? 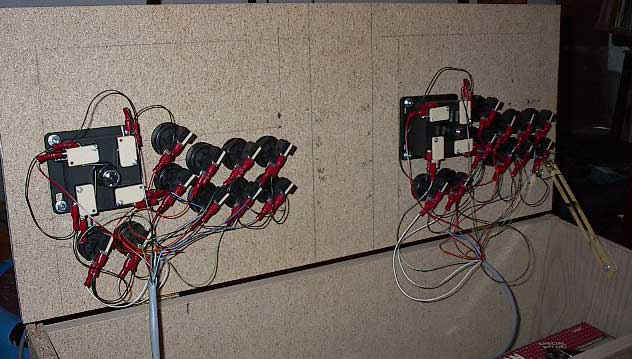
Not the prettiest wiring job in the world, but it gets the job done. One thing I did that I think was pretty slick was mounted the top on a hinge so I can get to the guts easily. You can't see the wires coming out of the box, but there's 2 15 connector cables hooked up to 15 pin d sub females. Reason I did it like that is I'm going for a Neo-Geo type thing and these sticks even with the extra buttons are NG compatible. Plus there's gobs of stuff on the web about adapting NG sticks to other systems. So, to the cost break down: The wood came from an old bookshelf = Free
Buttons and sticks from X-Arcade = $20 + 7.95 shipping
Cable and D sub connectors = $14 or so Even though there's a few little flaws with the woodworking (something I'm not good at) it's not too shabby for under $50. I realized after I had this done that the box is actually big enough I could mount the entire SuperGun in it, but considering I want to use these sticks on other consoles, I really didn't want to add the weight plus I'd have to hook up some kind of external connectors anyway. Phase 1 is finished! Too bad I can't start using them just yet. Man, I'm itching to break these puppies in!
Wed Apr 23, 2003 8:20 pm The rest of my parts arrived from Bob Roberts today and... 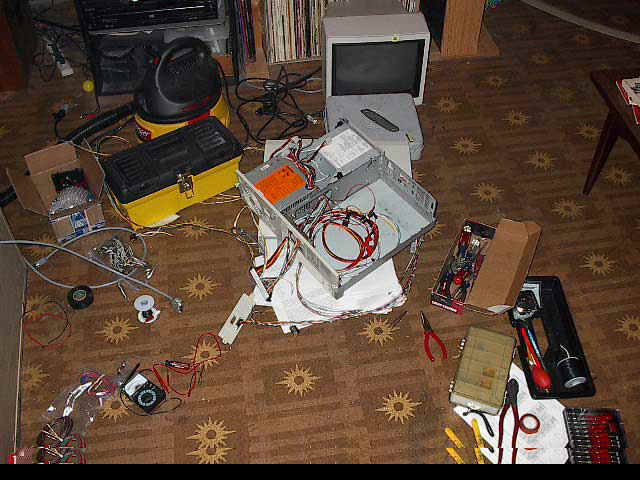
First off, I must say his JAMMA harness is wired with enough colors even an idiot could easily figure out what is what. However, he hadn't counted on a damn idiot trying to wire this sucker up. :D The problem I've run into is this, I hooked two of the controller inputs up wrong. Well, I thought they were right, but I'm putting them into a d-sub connector and put the last two lines in the wrong side. I'm using crimp connectors rather than soldering, and I broke the damn pins off in the connector. Fucked up the other one the same way. So I gotta go back to the store tomorrow and buy two new connectors to replace the ones I screwed up. As for everything else, video is wired up, power is wired up, the only thing left to do is fix the controller ports, wire up the test switches, and figure out what I'm going to do for the sound. I still don't have a board to test with, so I guess it's no big rush to get it done. I'm a little frustrated with my idiocy, but what can I say?
Thu Apr 24, 2003 8:31 pm It's done and it looks like this... 
Front side with the controller ports, test switches (crooked as hell, I might add) and the On/Off switch. 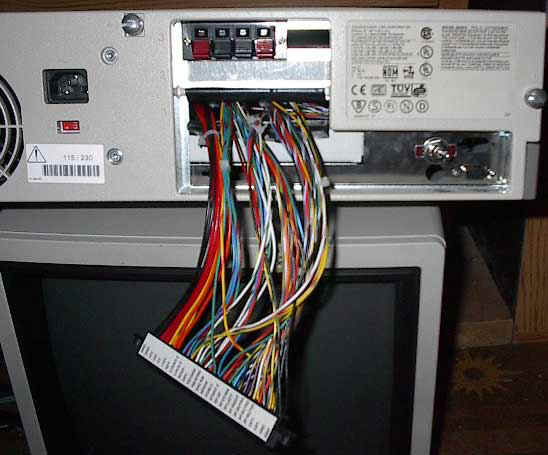
From the back, you can see the JAMMA harness, speaker terminals, a switch I put in to switch between normal JAMMA sound and Neo Geo Stereo, and the port for the RGB cable. 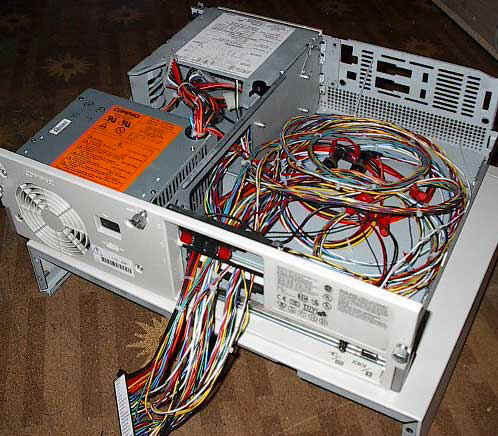
It's funny that I thought this case was gonna be way too big. Since I didn't trim any of the wires on the harness (and Bob Roberts is thankfully generous with them) I needed the space to coil everything up. Plus it dawned on me that I could put the PCB on top of the case while I'm playing it. So, there it is. The kick in the ass is, I don't know 100% if it works or not yet because my board I got off eBay hasn't arrived yet! However, I've tested it up and down with the multimeter and it seems like everything is a go. As for final cost...it's hard to say because I haven't really done an itemized look at what I've spent yet. I tended to overbuy stuff when I bought things, like I've got a ton of wire I didn't use because I knew I'd use it eventually. I think if you factor out what I didn't use and a few things I bought that I didn't need, I'm probably weighing in at $140-ish, and that's including the controller. And there are certainly a few things I could have done without to save a few bucks here and there if I'd really wanted to do it on the cheap. Labor hours? Again with the controller, which was probably the most labor intensive part of the whole thing, 6-8 hours. I wasn't keeping really good track of time, and I worked for a while then did something else for a while, plus I screwed up a few times and had to backtrack, so someone a bit more on it than I could whip this thing up a lot faster. If I had wanted to do this cheaper, I'd have hacked an old Saturn pad like I was thinking about. That would have probably taken $40-$50 off right there. Also I could have tried to make my own RGB to composite video adapter. There are chips out there, I just didn't feel like fucking with it. If I'd wanted to do this easier, I would have bought Neo Geo sticks or MAS sticks. My controller ports are wired up with a Neo Geo pinout, so I could use those if I had them. Wiring up those controllers sucked. Not impossible, but a lot of stripping and crimping. So hopefully I'll have my board tomorrow, and get some pics of this thing in action for the 3 of you actually reading this.
Fri Apr 25, 2003 3:43 pm IT'S ALIVE!!!!!! 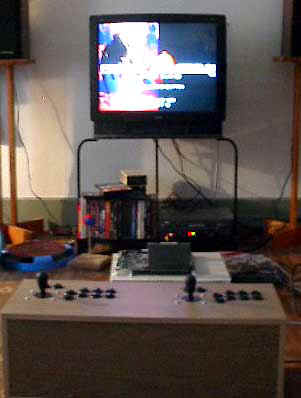
Sucky pic, but here's the finished product running Radiant Silvergun. Had one slight scare, I didn't get the plug for the RGB converter pushed all the way in, so the colors were wonky. Once I figured that out, it was golden! I'm a little surprised everything worked right the first time, maybe today is my day to buy a lotto ticket. :) I can already see a few improvements I'm going to need to make, rather I can hear them. The sound is a little crackly, nothing a line level box wouldn't fix. Now too high on the priorities right now, but I'll do it eventually. I'm also going to need to reinforce the ports a little better. Compaq clearly didn't design those covers for what I'm using them for and the bend a little more than I like. No big deal tho. So there you have it...I'm finally in SuperGun bliss! Those crimp connectors I used were a real time saver, in fact, I only had to solider 2 points during this entire project. One problem I'm going to have when I get a Capcom board is my bottom buttons are JAMMA 1,2,3,4 so I'll have to flip everything around otherwise I'll have kicks on the top rather than bottom. But that shouldn't be such a big deal.
Fri Apr 25, 2003 10:26 pm To those who have contacted me, thanks for the interest! Let's see what I can do to answer some questions: The PSX hack looks ugly, but is actually pretty simple. Lot of soldering tho. I'm planning on doing this myself, but haven't done it yet. And yeah, I popped my RS cherry today. Whoo hoo!!! 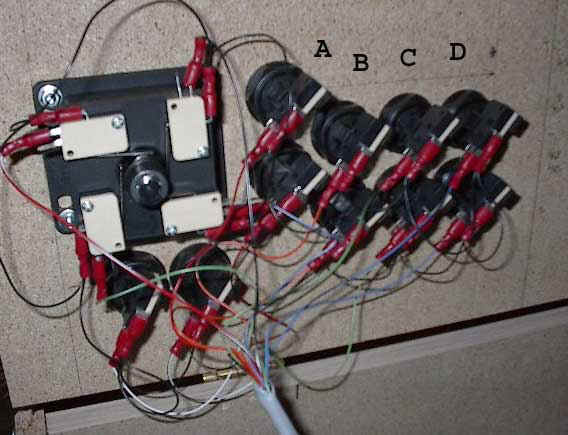
Here's a better look at the Player 1 side of my controller. I labeled the buttons (keep in mind this is upside down.) Standard JAMMA and Neo-Geo allows for 4 buttons, and that's how I have it hooked up. Now, when I get a Street Fighter board, Capcom uses 3 buttons from the JAMMA harness for punches and an extra 3 buttons on a "kick" harness , which is an extra connector on the board, for the kicks. For my sticks, I'll have to change things around so that bottom row of buttons is on top. Otherwise, I'll have my punches on the bottom and the kicks above them. I suck at SF enough already, I don't need more of a handicap. LOL 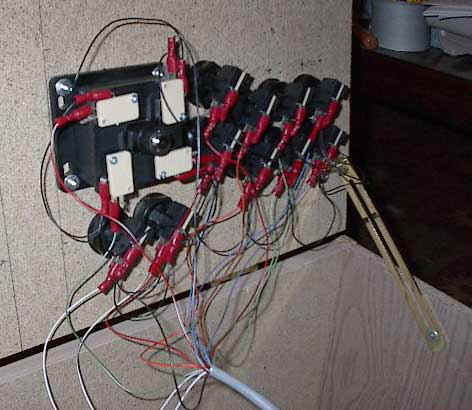
There's Player 2's side, same deal. Since I used those crimp connectors (all the red deals you see sticking out everywhere) I can just unplug the bottom row and plug them into the tops and vice versa. Does that make sense? I feel like I'm not explaining it well, but hopefully you can understand what I'm saying. 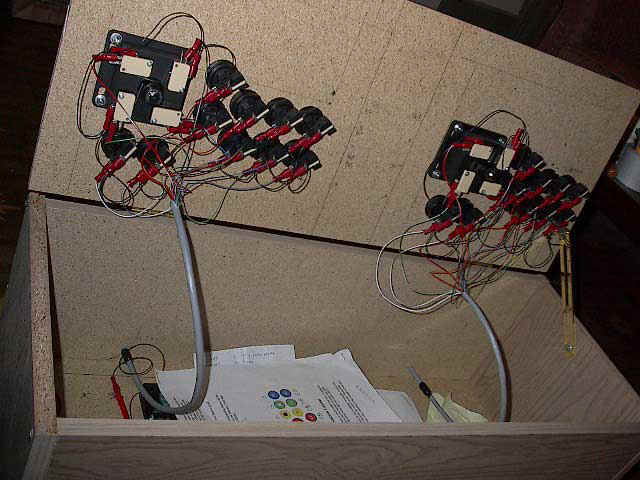
There's another pic of the inside, I'm using it as a tool box right now. There's a lot of room to navigate in there, and my cats dig hiding out in there if I leave the top open for too long. But to sum up the sticks, they're set up to play with any standard JAMMA PCB right now. If I get a board with a kick harness, I'll have to change some things around. 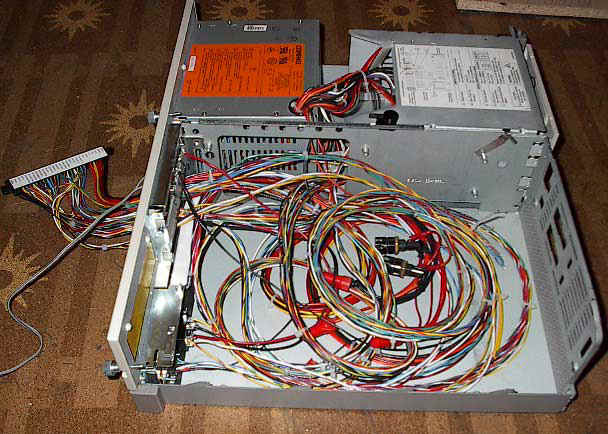
Here's another look inside. It looks like there's a lot going on, but 90% of that is just coiled up wire. I couldn't bring myself to trim everything down. Never know when or why you might need it. I'm using the PC power supply that was in the Compaq case. I could trim a lot of those wires because I only need +5V -5V +12v and ground. In fact, I don't even have the -5V hooked up yet because I don't need it on the ST-V board. Oh, you might also notice I put two fuses in the power line. Yeah they're panel mount fuse holders, but they work. If you see the red wire nuts, that's where all the power is hooked up. Did it that way so I can add a power line easily if I need to (and actually I did need to send one to the RGB converter.) 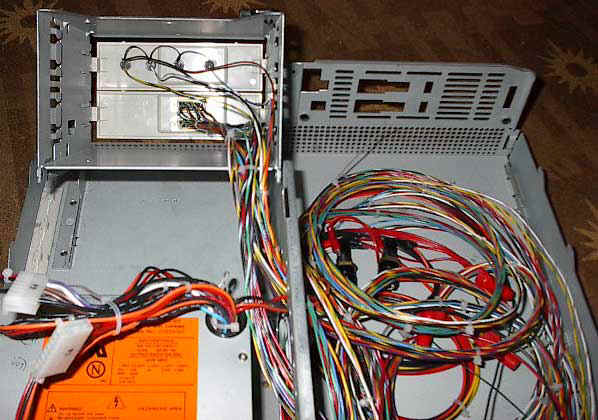
There's the back of the test switches and the controller ports. I used the drive cage and the blanks from the Compaq to mount those. Worked out ok 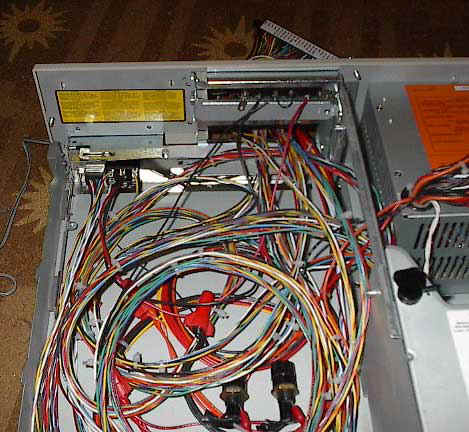
And here's a look at the back side connectors. I used the slots already in the case for everything. On the left, you can kinda see the RGB output, mounted in the same slot the video out was when this was a computer. Next to that is my sound switch, which needs some work. I ran the JAMMA harness out the card slot holes, and I lined the slot with tape so I don't snag any of the wires. The harness is actually sticking out upside-down, so I can bend it up top and put the PCB on top of the case. Then it's right side up. You can also kind of see my speaker terminals. So anyway, that's pretty much all there is to it. The gun itself consists of very little other than wire. If you have anymore questions, let me know and I'll try to answer them. This was a fun project and no one around here is gonna dig it like you people will! |

